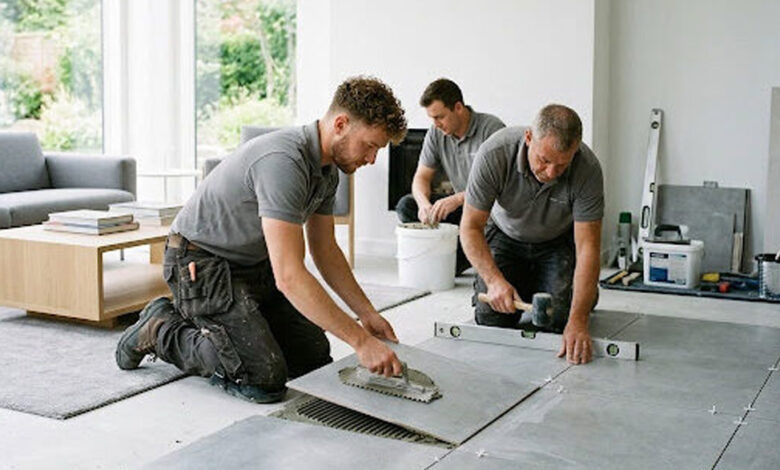

Tile is one of the most versatile materials used in modern homes and commercial properties. It can transform floors, walls, kitchens, bathrooms, entryways, patios, and other surfaces while providing a combination of durability, easy maintenance, and visual appeal. Available in countless colors, patterns, textures, sizes, and materials, tile can complement almost any interior or architectural style. However, achieving a polished and long-lasting result depends on much more than selecting an attractive tile. Proper surface preparation, accurate measurements, suitable adhesives, careful placement, consistent spacing, and appropriate finishing all contribute to the quality of the completed project. Professional Tile Installation can help ensure that these details are handled correctly from the beginning.
A well-installed tile surface can remain attractive and functional for many years, while poor installation can result in cracked tiles, uneven surfaces, loose pieces, damaged grout, moisture problems, or other costly issues. For this reason, the installation process deserves the same attention as the tile itself. Understanding the stages involved can help homeowners make better decisions when planning a new tile project or replacing an existing surface.
Understanding the Importance of Proper Tile Installation
Tile may be extremely durable, but its performance depends heavily on the foundation beneath it. If the surface is uneven, unstable, damp, or improperly prepared, even high-quality tiles may eventually develop problems. Cracks can occur when movement beneath the tile places stress on individual pieces, while uneven surfaces can produce lippage, creating noticeable differences in height between adjacent tiles.
Proper installation creates a stable connection between the tile and the underlying surface. The installer must consider the type of substrate, the intended use of the area, the tile material, moisture exposure, and other environmental conditions before choosing appropriate installation methods.
A professional approach also helps create a consistent appearance. Straight lines, uniform joints, balanced patterns, and clean edges can make a significant difference in how the finished surface looks. These details are especially noticeable in large open areas or spaces with strong geometric patterns.
Choosing the Right Tile for the Space
The first major decision in a tile project is selecting a product that is appropriate for the intended application. Different tiles have different characteristics, and a material that works well on a wall may not be suitable for a heavily used floor.
Porcelain and ceramic tiles are common choices because they are available in many designs and can provide good durability when properly selected and installed. Natural stone options such as marble, granite, slate, and travertine can create distinctive appearances but may require additional maintenance or specialized installation techniques.
The surface finish also matters. Glossy tiles can create a bright and polished appearance but may not be ideal for every flooring application. Textured or matte finishes can provide different visual and practical characteristics.
Before purchasing a tile, consider where it will be installed, how much traffic it will receive, whether it will be exposed to moisture, and how much maintenance you are willing to perform.
Measuring the Installation Area
Accurate measurements are essential for determining how much tile and installation material will be required. The area should be measured carefully, including irregular sections, alcoves, corners, and other features that may affect the layout.
It is generally wise to purchase additional tile beyond the exact calculated area. Extra material can account for cutting, breakage, pattern matching, and future repairs. The amount of additional material required can vary depending on the size and complexity of the space.
Large-format tiles may require more careful planning because the layout can affect how many cuts are needed. Patterned tiles may also require additional material to maintain continuity across the surface.
Taking time to measure accurately before work begins can help prevent unnecessary delays and reduce the risk of running short of matching material.
Preparing the Surface Before Installation
Surface preparation is one of the most important stages of any tile project. The substrate should be clean, stable, dry where appropriate, and suitable for the tile and adhesive system being used.
Dust, grease, old adhesive, loose materials, and other contaminants may interfere with bonding. Uneven surfaces may need to be corrected before tile is installed, while damaged substrates may require repair or replacement.
Moisture-prone areas require additional attention. Bathrooms, showers, and other wet environments may need appropriate waterproofing systems beneath the tile. Tile itself is not automatically a waterproof barrier, and moisture can potentially travel through grout joints or other pathways if the underlying assembly is not properly designed.
Professional preparation helps establish a reliable foundation before the visible part of the project begins.
Planning the Tile Layout
A carefully planned layout can significantly improve the appearance of the finished surface. Installers often determine where the centerlines and major visual features should fall before applying adhesive.
Starting in an arbitrary corner can sometimes leave very narrow pieces along the opposite wall, creating an unbalanced appearance. A thoughtful layout aims to distribute cuts in a way that looks intentional and symmetrical.
The layout also needs to account for fixed features such as cabinets, doorways, drains, fixtures, and transitions between different flooring materials. Planning these elements in advance reduces the likelihood of awkward cuts or inconsistent patterns.
For decorative or patterned tiles, layout planning becomes even more important because the design needs to remain visually consistent throughout the space.
Selecting the Appropriate Adhesive
The adhesive or mortar used for tile should be compatible with both the tile and the surface. Different tile materials, installation locations, and environmental conditions may require different products.
Using an unsuitable adhesive can lead to poor bonding, movement, cracking, or tiles becoming loose over time. The manufacturer’s recommendations should be followed carefully, including requirements for surface preparation, mixing, application thickness, working time, and curing.
Professional installers understand that adhesive selection is not simply a matter of choosing the strongest product available. The material needs to be appropriate for the specific installation system.
Creating Consistent Tile Spacing
Grout joints are an important visual and functional part of a tiled surface. Consistent spacing creates clean lines and helps produce a professional appearance.
Spacers or other layout tools can be used to maintain uniform joints, although the appropriate joint width depends on the tile, surface, design, and installation requirements. Some tiles have slight dimensional variations, particularly certain natural materials, so the installer may need to make adjustments while maintaining the overall pattern.
Consistent spacing also helps ensure that grout is distributed appropriately between tiles. Uneven joints can make even attractive tiles appear poorly installed.
Cutting Tiles With Precision
Most tile projects require some cutting, especially around corners, doorways, fixtures, outlets, drains, and other obstacles. The quality of these cuts can have a major effect on the final appearance.
Professional tile installers use appropriate cutting equipment based on the tile material and the type of cut required. Straight cuts may be relatively simple, while curved or detailed cuts require greater precision.
Edges that will remain visible should be finished appropriately. Poorly executed cuts can create sharp or uneven edges and may leave visible gaps around fixtures.
Careful measurement before cutting is essential because a mistake can waste material and disrupt the planned layout.
Installing Tile on Floors
Floor tile must be installed on a stable surface capable of supporting the expected loads. The installer also needs to consider movement, transitions, drainage where applicable, and the overall flatness of the substrate.
Large-format floor tiles can be particularly sensitive to uneven surfaces because their size makes changes in elevation more noticeable. Proper preparation and appropriate installation techniques can help minimize unevenness between adjacent pieces.
The finished floor should provide a stable, comfortable walking surface. Areas exposed to water may also require tiles with suitable slip characteristics for their intended use.
Installing Tile on Walls
Wall tile provides an opportunity to introduce decorative elements, create visual focal points, and protect surfaces from moisture and everyday wear. Kitchens and bathrooms are common applications, but tile can also be used on fireplaces, feature walls, entry areas, and other spaces.
Wall installations require careful attention to support, alignment, and gravity. Larger or heavier tiles may require specific installation methods to ensure they remain securely bonded.
The layout should be considered in relation to cabinets, countertops, plumbing fixtures, windows, and other architectural features. A balanced layout can make the entire room appear more polished.
Tile Installation in Moisture-Prone Areas
Bathrooms and shower areas require especially careful planning because moisture can cause serious damage if it reaches materials that are not designed to remain wet.
A proper waterproofing system should be established beneath the tile where required. Corners, seams, penetrations, drains, and transitions need careful treatment because these are potential pathways for moisture.
Grout should not be considered the sole waterproofing mechanism. The complete wall or floor assembly should be designed to manage water appropriately.
During Tile Installation, choosing suitable materials and following appropriate waterproofing practices can help protect the surrounding structure while creating a durable finished surface.
Choosing the Right Grout
Grout fills the joints between tiles and contributes to both appearance and performance. It is available in different colors and formulations, with some products offering enhanced resistance to staining or moisture.
The grout color can significantly influence the visual appearance of the finished installation. A matching color can create a more uniform appearance, while contrasting grout can emphasize the individual tile shapes and pattern.
Grout should be applied according to the manufacturer’s instructions, including mixing, working time, application, and curing. Improperly mixed or installed grout may crack, crumble, discolor, or fail prematurely.
Once cured, appropriate cleaning and maintenance can help preserve the appearance of the joints.
Sealing Certain Tile and Grout Materials
Not every tile requires sealing, but some natural stones and certain grout products may benefit from or require a protective sealer. Sealing can help reduce the absorption of moisture and staining in suitable materials.
The correct sealer depends on the surface. Using the wrong product can alter the appearance of some stones or create undesirable residue.
Homeowners should follow the manufacturer’s recommendations regarding whether sealing is required and how frequently it should be repeated. Regular maintenance should also take into account the specific tile and grout materials used in the project.
Common Tile Installation Mistakes
One of the most common mistakes is failing to prepare the substrate properly. Installing tile over a dirty, unstable, or uneven surface can create problems that become visible only after the project is completed.
Another mistake is poor layout planning. Small, awkward cuts at highly visible edges can make a finished room appear unbalanced. Taking time to establish the layout before applying adhesive can prevent many of these issues.
Using too little adhesive or applying it incorrectly can also result in inadequate bonding. Likewise, failing to maintain consistent coverage beneath larger tiles may leave unsupported areas.
Rushing the curing process is another problem. Adhesives and grout need sufficient time to set according to their product requirements. Walking on or exposing newly installed tile to heavy use too soon can interfere with the finished result.
Maintaining a Newly Tiled Surface
Once the installation is complete, proper maintenance can help preserve the appearance and performance of the surface. Regular sweeping or vacuuming can remove abrasive dirt and debris, while appropriate cleaning products can help prevent buildup.
Harsh chemicals should not be used unless they are specifically recommended for the tile and grout. Some natural stones can be damaged or discolored by acidic cleaners.
Spills should be addressed promptly, especially on porous materials. Grout should also be monitored for cracks, discoloration, or deterioration.
Small maintenance issues are generally easier to address when discovered early. Regular inspection can help identify loose tiles, damaged grout, or moisture concerns before they become more extensive.
Hiring a Professional Tile Installer
Although some homeowners choose to install tile themselves, larger or more complex projects can require considerable skill and preparation. Professional installers understand how to handle difficult layouts, large-format materials, moisture-prone areas, detailed cuts, and challenging substrates.
When hiring a professional, ask about their experience with the specific type of tile and installation area involved. A contractor who primarily works with simple floor tile may not have the same experience with intricate patterns, natural stone, or complex shower installations.
It is also useful to discuss the scope of work before construction begins. Confirm what surface preparation, waterproofing, materials, installation, grouting, sealing, and cleanup are included.
Planning a Successful Tile Project
A successful tile project begins well before the first tile is placed. Determine the purpose of the space, choose suitable materials, establish a realistic budget, measure carefully, and plan the layout in advance.
Consider how the finished surface will interact with existing cabinets, walls, fixtures, doors, flooring, and other features. A tile selection that looks attractive by itself may produce a very different appearance when installed across a large area.
It is also important to account for future maintenance. Some materials may require more regular care than others, so the best choice should reflect your lifestyle and willingness to maintain the surface.
Final Thoughts
Tile can provide an excellent combination of beauty, durability, versatility, and practicality, but achieving these benefits requires careful workmanship. From selecting the appropriate material to preparing the substrate, planning the layout, applying the correct adhesive, maintaining consistent spacing, making precise cuts, and completing the grout work, every stage contributes to the finished result.
Professional tile installation can be particularly valuable for projects involving large areas, complex patterns, moisture-prone rooms, natural stone, or challenging surfaces. Experienced installers can identify potential problems before they become costly and use appropriate techniques to create a stable and attractive finished surface.
Homeowners can support the success of a project by choosing suitable materials, communicating their expectations clearly, and understanding the maintenance requirements of the selected tile. Proper care after installation can help preserve the appearance and functionality of the surface for many years.
Ultimately, tile is more than a decorative finish. When properly selected and installed, it can protect surfaces, simplify maintenance, improve the visual character of a room, and provide lasting everyday performance. Taking the time to plan the project carefully and prioritize quality workmanship can make the difference between a surface that simply looks good when new and one that continues to perform beautifully over time.
Whether the project involves a small backsplash, a bathroom floor, a complete kitchen surface, or an extensive renovation, thoughtful planning remains the foundation of a successful result. With appropriate materials, accurate preparation, professional techniques, and regular maintenance, a tiled surface can become a durable and attractive part of the property for years to come.